SQURE.IO - Support
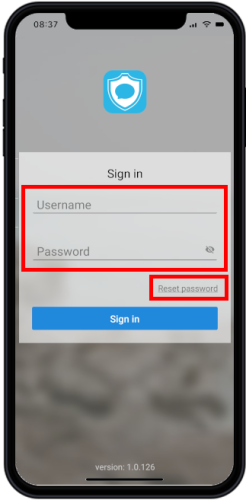
Login:
When you start the app for the first time, you will be asked to enter your login details.
Please enter your username in the “Username” field. The password is entered in the “Password” field. You will receive the login data by e-mail. If you have not received them or have forgotten them, please contact the support at support@squre.io.
If you have forgotten your login data, you can request a new password via “Reset password”.
After successful login you will be redirected to the message menu.
When you log in for the first time, you must also accept the terms of use in order to use the app.
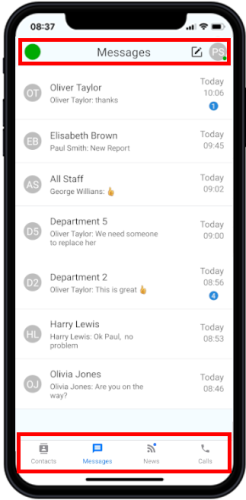
Screen layout
At the top are the availability indicator, the description of the area you are in (contacts, messages, news or calls) and your account avatar (initials).
By pressing on your avatar, the settings are displayed. You will also find the “Direct Chat” button under Messages in the upper area (to the left of the avatar) and the “Direct Call” button under Calls in the upper area (also to the left of the avatar). This function can be used to search for employees and contact them by chat or call. In the message section, you can also create chat groups with employees of the company. (These group chat groups will then also appear in the contacts section).
Press the availability indicator to change your status. Green means “ready”, yellow stands for “busy” and red for “unavailable”. These colors are messages to the outside world. You will also receive calls and messages when you are “red”.
If you are logged out or have no network reception, you will be seen as “grey” by third parties. In this case you are actually not reachable. The grey dot cannot be set manually.
The main part of the screen is taken up by the currently selected function (contacts, messages, news or calls).
In the lower area you can switch between the 4 main functions. Here, a blue dot above the respective symbol indicates whether new messages have arrived or whether you have missed calls.
Contacts
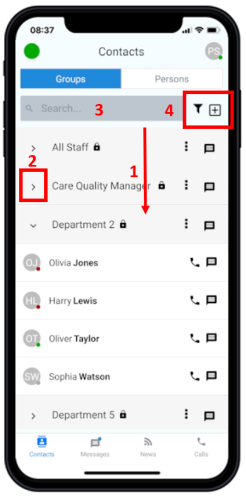
Here you can see your contacts. The display can be sorted by groups or persons.
1) The display can be updated manually using the “pull down” gesture.
2) When you press the group name, the participants of the group are displayed. A green dot under the initials indicates that the participant is “available”. A red dot means “not available”. A grey dot means that the person in question is logged off (not available).
Press the speech bubble next to the group name to open the chat window (messages) of the selected group.
3) In the search field you can search for groups or persons.
4) The filter icon allows filtering by availability.
You can create your own groups with the plus symbol. This function is described in more detail later.
Messages
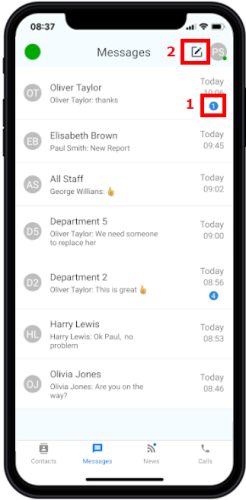
The message area shows all received and sent messages. Group chats are marked with a group symbol. Chats with individual persons are shown with their initials.
Selecting a chat opens it
1) The number in the blue circle shows the number of unread messages in the chat.
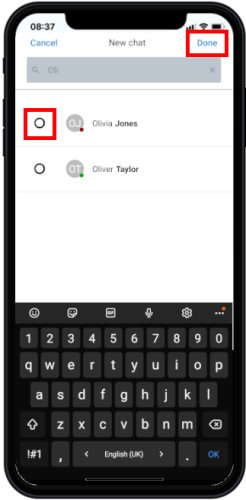
2) Via the “Direct Chat” icon, a new chat can be opened for a staff member. To do this, enter the desired name in the search window that appears and select the staff member. If several employees are selected, a group chat will be created, which will then also appear in the Contacts area.
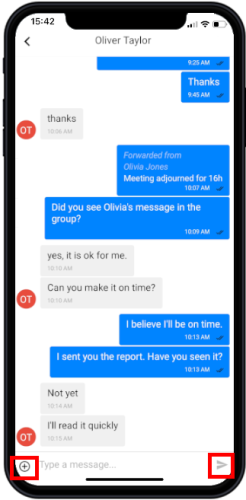
Chat Area
The chat window shows a list of all chats. By pressing the + next to the text input, you can choose from text templates. These are then inserted into the text field. In addition, files and photos can be sent with this.
If you press the icon to the right of the text field, the message is sent.
Messages from users who are not part of the group are marked “external”.
These messages must be replied to personally. (All participants in the group see the external message, but the sender can only read replies personally addressed to him/her). This is done by pressing and holding the message until a menu opens. In this menu, select “reply” to reply directly to the user. This function is only available in public groups.
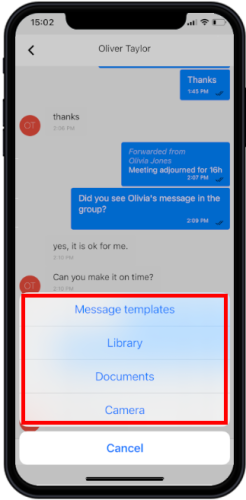
Sending Files
If you tap on the ⊕-symbol next to the text field, the menu for selecting message templates and for sending files or pictures opens.
Select “Gallery” to send pictures from the picture gallery of your device. If you select “Files”, you can send any files to the chat.
“Camera” opens the camera application for taking and sending a photo.
After selecting a file or a picture, the picture is uploaded. When the upload is complete, all group participants can view the file.
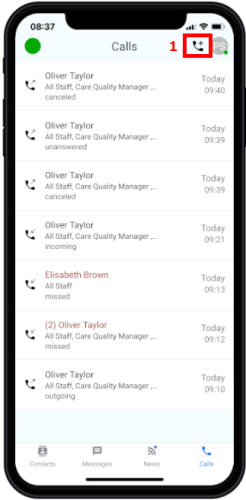
Phone Calls:
In the call history you can see calls made, received and missed.
For each logged call, the date and time as well as details of the called partner are displayed.
Press the entry to start a new call or press the “Direct Call” button (1) in the top right-hand corner to start a call to a staff member in the company via a search function.
The call list can be updated by “dragging down”.
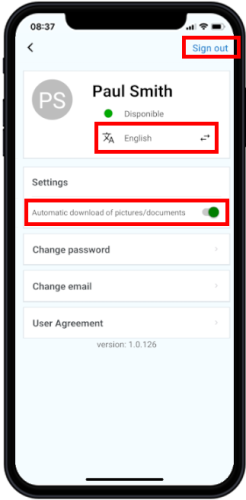
Settings
Here you can select the display language of the app.
The groups to which you belong are also displayed.
If you press “Sign out”, you will be logged out and no longer reachable. In this case you will be displayed to other users with a grey indicator (logged out).
To use the application again, you must log in again with your username and password.
Use the “Automatic download” switch to activate automatic download of pictures in the chat. If automatic download is deactivated, the image is only downloaded after “download” is touched.
You can use the “Change password” function to set a new password for your account. You will then be logged out and have to log in again.
You can set your e-mail address using the “Change e-mail address” function.
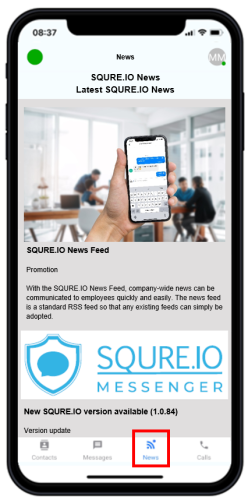
Corporate News Feed (Optional)
If desired, an RSS feed can be integrated into the app. A standard RSS feed serves as the source. With the RSS feed, news and updates concerning the company can be distributed quickly.
The RSS feed updates automatically and indicates changes in the feed by a blue dot on the feed icon.
Creating Groups
Clicking on the ⊕ icon opens the window for creating a new group.
Please enter the group name here. Select whether the group should be “private”, i.e. only visible to the group members, and click on “Next” – you will then be taken to the “Assign group members” screen.
Note: Even though the group is public, messages cannot be read by non-members. However, it is possible for anyone to send messages to this group. These messages are marked as “external” within the group. It is then possible to reply to these messages specifically.
Non-members only see their own messages and the replies.
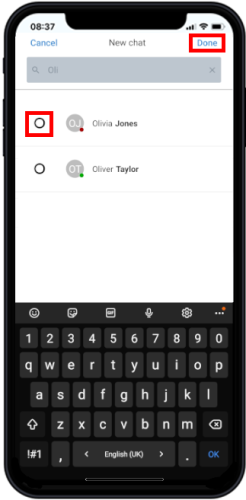
Adding Group members
This screen is used to define the members of the group. To add members, enter the desired name (usually a few letters are enough) in the search field and select the staff member. Other members can then be selected and added. Click on “Done” to create the group. After a few seconds the group is displayed in the contacts.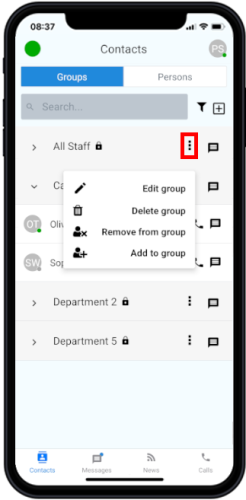
Edit Groups
To edit the group, touch the three dots right to the name and select the desired function from the menu.
The following functions are available for editing the group:
• Change group name, set private or public
• Delete group
• Remove contacts
• Add contacts
Attention: If a group is deleted, the messages in this group are also deleted and cannot be restored.
In case of problems with the app:
If you have any questions, you can always contact the support chat in the SQURE.IO app.
Close and restart the app:
• IPhone with home button (before IPhone X): Press the home button twice. Swipe the SQURE.IO app window away upwards.
• IPhone without home button (from IPhone X): Swipe the app window upwards briefly. You can then close the app by swiping upwards.
• Android: Press the button to display the windows of the last apps. This button is normally located at the bottom left. Then swipe the SQURE.IO app window away towards the top.
If the problem persists, please restart your device once. Please contact the support at support@squre.io if the restart did not help either. Describe the problem as precisely as possible. Please also describe the steps you took that caused the error to occur in the app.
